
Lets create a WPF Project from scratch, i mean really from the scratch.
Lets begin.
Step 1 : First create an empty project.
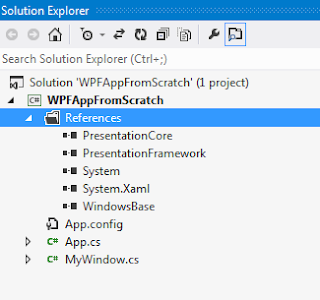
Step 2 : Add the following DLL reference in your project.
Presentation Framework
Presentation Core
Windows Base
System.xaml
This is better shown below. Click on it to enlarge.
Step 3 : Add two New classes to your project
App.cs
MyWindow.cs
The MyWindow.cs class is your custom window and this will extend the base class window. when you run your application this is the window we will see. Please note that there is no xaml window declaration and please do not get confused by reference to the system.xaml dll. we will make use of this in our next example.
using System;
using System.Collections.Generic;
using System.Linq;
using System.Text;
using System.Threading.Tasks;
//Add these namespaces
using System.Windows;
using System.Windows.Controls;
namespace WPFAppFromScratch
{
//This will be your custom window class which is derieved
//from the base class Window.
class MyWindow : Window
{
//Declare some UI controls to be placed inside the
//window.
Button _searchButton;
TextBox _searchTextBox;
//The controls can be placed only inside a panel.
StackPanel _panel;
public MyWindow()
{
//This is created just to show a reference , the
//below code can aswell be witten wihin this
//constructor.
InitializeComponent();
}
void InitializeComponent()
{
_searchButton = new Button { Height = 30, Width = 100, Content = "Search" };
_searchTextBox = new TextBox{ Height = 30, Width = 100 };
_panel = new StackPanel();
//Add the controls inside the panel.
_panel.Children.Add(_searchButton);
_panel.Children.Add(_searchTextBox);
//Set this panel as the content for this window.
this.Content = _panel;
}
}
}
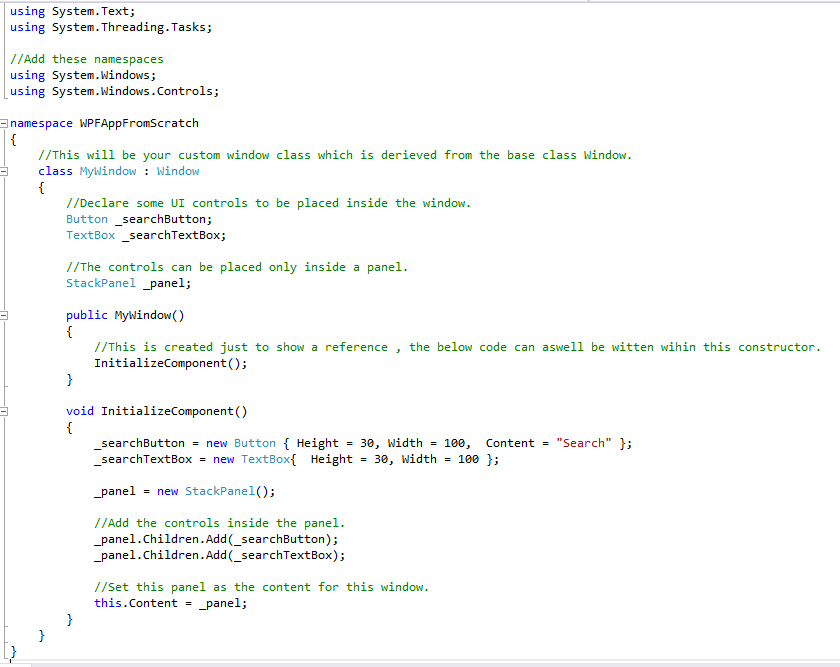
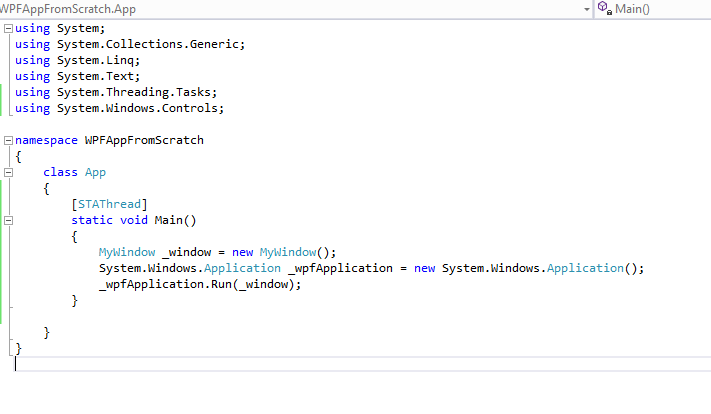
Step 4 : Now Open the file App.cs and type the below code.
using System;
using System.Collections.Generic;
using System.Linq;
using System.Text;
using System.Threading.Tasks;
using System.Windows.Controls;
namespace WPFAppFromScratch
{
class App
{
[STAThread]
static void Main()
{
//Create an instance of your window.
MyWindow _window = new MyWindow();
//Create an instance of a new Application
System.Windows.Application _wpfApplication = new System.Windows.Application();
//Run this Application by passing the window object
//as the argument
_wpfApplication.Run(_window);
}
}
}
 Step 5 : Now right click on the project the click on properties. Here in the Applications tab set the output type of the project to Windows Application as shown below.

Step 6 : All done. you are good to go now. click on debug and you will see this below window.

This window is your own custom window. Congrats , you just created a WPF project from scratch..
Lets begin.
Step 1 : First create an empty project.
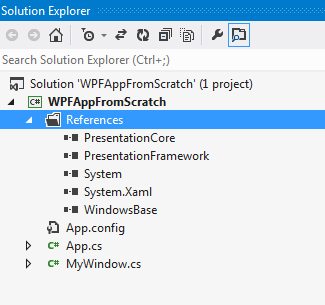
Step 2 : Add the following DLL reference in your project.
Presentation Framework
Presentation Core
Windows Base
System.xaml
This is better shown below. Click on it to enlarge.
Step 3 : Add two New classes to your project
App.cs
MyWindow.cs
The MyWindow.cs class is your custom window and this will extend the base class window. when you run your application this is the window we will see. Please note that there is no xaml window declaration and please do not get confused by reference to the system.xaml dll. we will make use of this in our next example.
using System;
using System.Collections.Generic;
using System.Linq;
using System.Text;
using System.Threading.Tasks;
//Add these namespaces
using System.Windows;
using System.Windows.Controls;
namespace WPFAppFromScratch
{
//This will be your custom window class which is derieved
//from the base class Window.
class MyWindow : Window
{
//Declare some UI controls to be placed inside the
//window.
Button _searchButton;
TextBox _searchTextBox;
//The controls can be placed only inside a panel.
StackPanel _panel;
public MyWindow()
{
//This is created just to show a reference , the
//below code can aswell be witten wihin this
//constructor.
InitializeComponent();
}
void InitializeComponent()
{
_searchButton = new Button { Height = 30, Width = 100, Content = "Search" };
_searchTextBox = new TextBox{ Height = 30, Width = 100 };
_panel = new StackPanel();
//Add the controls inside the panel.
_panel.Children.Add(_searchButton);
_panel.Children.Add(_searchTextBox);
//Set this panel as the content for this window.
this.Content = _panel;
}
}
}
The Code will look something like this on your IDE.
Step 4 : Now Open the file App.cs and type the below code.
using System;
using System.Collections.Generic;
using System.Linq;
using System.Text;
using System.Threading.Tasks;
using System.Windows.Controls;
namespace WPFAppFromScratch
{
class App
{
[STAThread]
static void Main()
{
//Create an instance of your window.
MyWindow _window = new MyWindow();
//Create an instance of a new Application
System.Windows.Application _wpfApplication = new System.Windows.Application();
//Run this Application by passing the window object
//as the argument
_wpfApplication.Run(_window);
}
}
}
Be sure to add the STAThread attribute on top of your main function. The WPF applications are of Single Threaded Apartment type and if you do do not add this attribute , you will get an exception. Go ahead and try debugging
System.Windows.Application _wpfApplication = new System.Windows.Application();
Will instantiate a new Application , and passing a Window object to its Run() method will start the application with that Window.
The File will look something like this
Step 6 : All done. you are good to go now. click on debug and you will see this below window.
This window is your own custom window. Congrats , you just created a WPF project from scratch..
