Visual Studio 2015 ships with multiple open source command line tools that are used in modern web development like Git, Node, npm, bower, grunt.
But we also tend to install them manually in our development machines which are usually in their latest versions.
It is likely that when you run the Grunt file using the inbuilt task runner, visual studio will end up running the task using the Grunt installed as a part of its installation likely to be found in the path
" C:\Program Files (x86)\Microsoft Visual Studio 14.0\Common7\IDE\Extensions\Microsoft\Web Tools\External "
[this is for reference only and might change from machine to machine (i am on Windows 10) and on your installation as a whole but the path is a good starting point].
Now if you want visual studio to use the web tools installed by you manually, you can do so!
Go to Tools –> Options –> Projects and Solutions –> External Web Tools.

Take a note at the above screen shot, the paths will be searched in that order.
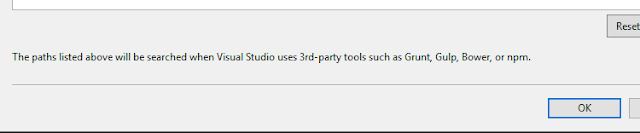
Notice that how $(PATH) is below the $(DevEnvDir)\Extensions\Microsoft\Web Tools\External
As mentioned before to use the manually installed web tools , you need to tell VS to check for tools available in the environment path variable and use the required tool if available.
To reorder the paths use the arrow buttons on the Top Right of the dialog window and move the $(PATH) above the $(DevEnvDir)\Extensions\Microsoft\Web Tools\External.
You can find more information at https://blogs.msdn.microsoft.com/webdev/2015/03/19/customize-external-web-tools-in-visual-studio-2015/