
Crystal Reports: Creating your first .NET embedded crystal report.
What is Crystal Reports Embedded? Crystal Reports embedded is an architecture which allows the Crystal Reports Rendering engine to run within the confides of the application environment. BusinessObjects provides a .NET runtime and a Java Report Component (JRC) which allows developers to embed Crystal Reports in their applications
Prerequisites :
We need to have the professional version of Visual studio 2010 or higher, the express version wont let you include Crystal reports in your application.
If you do not have a copy, you can download the trial version here
Next we require the SAP Crystal Reports, version for Visual Studio 2010.
Download it here Get more help on Installing it here .
Although after installing the above software you should be able to open the Crystal Report files for editing in visual studio, but it is best you install the Crystal Reports 2011 Designer IDE software , it is provided as one month FREE trial , you have to register though. Dowload it here
You also need the Crystal report runtime for your OS, for windows 7 Here is the link.
If any of the above links do not work, please search the below in google.
"SAP Crystal Reports, version for Visual Studio 2010"
"Crystal report run time"
"Visual studio 2010 Professional Trial"
Now the Development
To create your first crystal report within your .NET application follow the below steps.
1. Create a windows forms application and add a crystal report viewer component within your form.

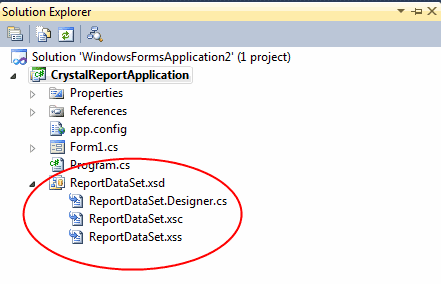
2. Add a new DataSet item within your project as shown below.


Now your Dataset is ready.
The Report Design
Now we can proceed with the report development.


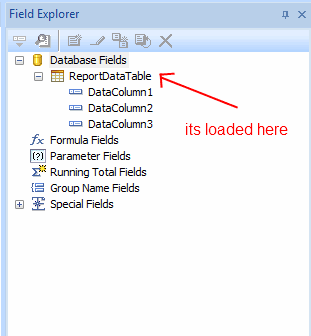
Now in the Field explorer , you can see the DataTable loaded within the Database Fields node.
If you expand this you can see the columns within the table.

You can also use the other tools provided in the IDE like Line, Box etc to make your report look better, as a beginner you can just leave the report to this for now. I have added a few lines on the report.


Now we can call our crystalreportviewer object and set this report as its report source as below
crystalReportViewer1.ReportSource = myReport;
Click on the {View Report} button


What is Crystal Reports Embedded? Crystal Reports embedded is an architecture which allows the Crystal Reports Rendering engine to run within the confides of the application environment. BusinessObjects provides a .NET runtime and a Java Report Component (JRC) which allows developers to embed Crystal Reports in their applications
Prerequisites :
We need to have the professional version of Visual studio 2010 or higher, the express version wont let you include Crystal reports in your application.
If you do not have a copy, you can download the trial version here
Next we require the SAP Crystal Reports, version for Visual Studio 2010.
Download it here Get more help on Installing it here .
Although after installing the above software you should be able to open the Crystal Report files for editing in visual studio, but it is best you install the Crystal Reports 2011 Designer IDE software , it is provided as one month FREE trial , you have to register though. Dowload it here
You also need the Crystal report runtime for your OS, for windows 7 Here is the link.
If any of the above links do not work, please search the below in google.
"SAP Crystal Reports, version for Visual Studio 2010"
"Crystal report run time"
"Visual studio 2010 Professional Trial"
Now the Development
To create your first crystal report within your .NET application follow the below steps.
1. Create a windows forms application and add a crystal report viewer component within your form.
- This is found in the Reporting tab in the ToolBox also note that i have added a button with the text View Report, this is just a novelty to load the report, you can do this in any other way u want to, For example the load event.

- Now if we look at the code behind we see that we can have the crystal report view object available, you can always set the name for this in its properties window like any other component.
2. Add a new DataSet item within your project as shown below.
- Right click on your project and click on Add --> New Item.

- Select DataSet as shown below.
- Provide a name
- Click on Add

- The DataSet object will be added to your project as shown below.
- A few files will be autogenerated as shown below
- Also the below tab will be opened. this is the visual(designer) for the dataset
- Here you can add a DataTable in two ways.
- One. As shown below drag and drop the table into the workspace as shown below

- Two. Right click on the workspace and select Add ---> DataTable

- As shown below the datatable is added , Now you can start adding columns to it.
- Right click on the table and say Add --> Column
- Alternatively you can select the DataTable and press [Ctrl + L]
- Also please change the Table Name as shown below.

The Report Design
Now we can proceed with the report development.
- Add a new item in your project --> Crystal Reports
- Provide a name and click Add

- If you have Crystal Reports installed in your development machine, the report will probably open in that. it will look like something shown below. Otherwise Visual studio provides a Embedded Crystal Reports Designer. More on this --> follow the link
- In the Field Explorer --> click on the Database Fields --> Database Expert as shown below

- The below pop-up will open Expand the Create New Connection node and double click on the ADO.NET(XML) node.

- The below pop-up will open
- Here in the file path we have to provide the location of the DataSet (.xsd) file that you created in the previous step. this is probably stored in your project folder, Right click on the project and click on explore using windows explorer.
- Once you locate the file, select the file and click on finish as shown below.

- The next screen will look something like this. The table that you had created in the DataSet will now be loaded in the left side. add this to the right side in the selected tables tab by clicking on the small > button in the center and click on OK

Now in the Field explorer , you can see the DataTable loaded within the Database Fields node.
If you expand this you can see the columns within the table.

- Now to display these fields in your report , you must drag them on to the Details section. as shown below.
- The column headers will be auto generated on the page header section as shown below

You can also use the other tools provided in the IDE like Line, Box etc to make your report look better, as a beginner you can just leave the report to this for now. I have added a few lines on the report.

- You can add some special fields from the special fields node in the field explorer
- I have added the Page N of M field.

- Save the Report and close it.
Now the Code.
The Code involves creating a ADO.NET DataSet object
A Report Object and setting the DataSource for this report as the above created DataSet object.
To create the ADO.NET Dataset
//Create the DataTable Object
Please note that in the above code the DataTable is given the same name as the name given for the DataTable we created in the first set i.e

To Add Rows to this DataTable
//Add a new DataRow object
Now that the DataSet is created, We can create an instance of our crystal report as below and Set its DataSource
//Create a report bbject as below
ReportDocument myReport = new MyCrystalReport();
The Code involves creating a ADO.NET DataSet object
A Report Object and setting the DataSource for this report as the above created DataSet object.
To create the ADO.NET Dataset
//Create the DataTable Object
DataTable ReportDataTable = new DataTable();
ReportDataTable.TableName = "ReportDataTable";
//Add Columns to this table
ReportDataTable.Columns.Add("DataColumn1");
ReportDataTable.Columns.Add("DataColumn2");
ReportDataTable.Columns.Add("DataColumn3");
//Create a DataSet object
DataSet ReportDataSet = new DataSet();
//Add this table to the DataSet object
ReportDataSet.Tables.Add(ReportDataTable);
Please note that in the above code the DataTable is given the same name as the name given for the DataTable we created in the first set i.e

To Add Rows to this DataTable
//Add a new DataRow object
DataRow newRow = ReportDataTable.NewRow();
newRow["DataColumn1"] = 1;
newRow["DataColumn2"] = "Mercury";
newRow["DataColumn3"] = "First planet in the system";
ReportDataTable.Rows.Add(newRow);
you can repeat this as many times you want.Now that the DataSet is created, We can create an instance of our crystal report as below and Set its DataSource
//Create a report bbject as below
ReportDocument myReport = new MyCrystalReport();
//Set its DataSource as below
myReport.SetDataSource( ReportDataSet);
myReport.SetDataSource( ReportDataSet);
crystalReportViewer1.ReportSource = myReport;
Do not forget to add this to your using statement
using CrystalDecisions.CrystalReports.Engine;
The complete source code is below
using System;
using System.Collections.Generic;
using System.ComponentModel;
using System.Data;
using System.Drawing;
using System.Linq;
using System.Text;
using System.Windows.Forms;
using CrystalDecisions.CrystalReports.Engine;
namespace CrystalReportApplication
{
public partial class Form1 : Form
{
public Form1()
{
InitializeComponent();
}
private void GenerateReport()
{
ReportDocument myReport = new MyCrystalReport();
DataSet tempDataSet = GenerateReportDataSet();
myReport.SetDataSource(tempDataSet);
crystalReportViewer1.ReportSource = myReport;
}
private DataSet GenerateReportDataSet()
{
//Create a new datatable
DataTable ReportDataTable = new DataTable();
ReportDataTable.TableName = "ReportDataTable";
//Add Columns to this table
ReportDataTable.Columns.Add("DataColumn1");
ReportDataTable.Columns.Add("DataColumn2");
ReportDataTable.Columns.Add("DataColumn3");
//Create a DataSet object
DataSet ReportDataSet = new DataSet();
//Add this table to the DataSet object
ReportDataSet.Tables.Add(ReportDataTable);
DataRow newRow = ReportDataTable.NewRow();
newRow["DataColumn1"] = 1;
newRow["DataColumn2"] = "Mercury";
newRow["DataColumn3"] = "First planet in the system";
ReportDataTable.Rows.Add(newRow);
newRow = ReportDataTable.NewRow();
newRow["DataColumn1"] = 2;
newRow["DataColumn2"] = "Venus";
newRow["DataColumn3"] = "Second planet in the system";
ReportDataTable.Rows.Add(newRow);
newRow = ReportDataTable.NewRow();
newRow["DataColumn1"] = 3;
newRow["DataColumn2"] = "Earth";
newRow["DataColumn3"] = "This is where we live";
ReportDataTable.Rows.Add(newRow);
newRow = ReportDataTable.NewRow();
newRow["DataColumn1"] = 4;
newRow["DataColumn2"] = "Mars";
newRow["DataColumn3"] = "Where we are trying to go";
ReportDataTable.Rows.Add(newRow);
newRow = ReportDataTable.NewRow();
newRow["DataColumn1"] = 5;
newRow["DataColumn2"] = "Jupiter";
newRow["DataColumn3"] = "The Giant";
ReportDataTable.Rows.Add(newRow);
newRow = ReportDataTable.NewRow();
newRow["DataColumn1"] = 6;
newRow["DataColumn2"] = "Saturn";
newRow["DataColumn3"] = "Planet of Rings";
ReportDataTable.Rows.Add(newRow);
newRow = ReportDataTable.NewRow();
newRow["DataColumn1"] = 7;
newRow["DataColumn2"] = "Uranus";
newRow["DataColumn3"] = "Boring planet";
ReportDataTable.Rows.Add(newRow);
newRow = ReportDataTable.NewRow();
newRow["DataColumn1"] = 8;
newRow["DataColumn2"] = "Neptune";
newRow["DataColumn3"] = "Boring again";
ReportDataTable.Rows.Add(newRow);
newRow = ReportDataTable.NewRow();
newRow["DataColumn1"] = 9;
newRow["DataColumn2"] = "Pluto";
newRow["DataColumn3"] = "Some say this is not a planet";
ReportDataTable.Rows.Add(newRow);
return ReportDataSet;
}
private void crystalReportViewer1_Load(object sender, EventArgs e)
{
}
private void button1_Click(object sender, EventArgs e)
{
GenerateReport();
}
}
}
The generated report is as below screen shots


No comments:
Post a Comment